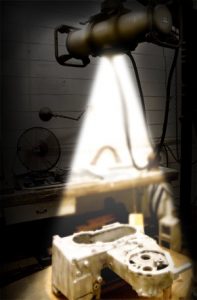
Nondestructive testing, or NDT, is a valuable and useful process, as it does not require the disassembly, dissection, or general sacrifice of a part or material.
Nondestructive testing, or NDT, is a valuable and useful process, as it does not require the disassembly, dissection, or general sacrifice of a part or material.
Fluorescent Dye Penetrant inspection (often abbreviated PT, FPI or LPI) is a nondestructive inspection method that provides detection of flaws open to the surface. It is a surface examination method only.
Basic Principle
This method of inspection works on the principle of capillary action. Fluorescent Dye Penetrant is applied by immersion, spraying or brushing to the part to be inspected. The Penetrant works its way into surface openings via capillary action. Excess surface Penetrant is removed while allowing the Penetrant in flaws to remain. A developer is applied which acts as a blotter to draw the Penetrant from the flaws creating an indication on the surface of the part. This indication is either visible or fluorescent depending on the type of Penetrant used.
Process Steps
History
Fluorescent Dye Penetrant inspection started in the 1890’s as the Oil and Whiting method. The Oil was actually kerosene and was used as the Penetrant. The whiting was chalk dust suspended in alcohol and was used as the developer. This method was utilized by the railroad industry to detect large cracks in their components.
Advantages
This method of inspection can be used on virtually any material and the results appear directly on the surface of the part. This method of inspection is used predominantly on nonferrous materials (aluminum, titanium, magnesium, etc.).
Limitations
The single largest limitation of this method is that it will only reveal flaws that are physically open to the surface. Therefore surface preparation is critical to the effectiveness of this inspection method. In certain instances it is necessary to perform a pre-penetrant etch to remove smeared metal or excessive oxides that may have formed blocking the opening to flaws.
Other Details
The Penetrant material is an oil based chemical with either visible or fluorescent dye. There are various types, methods and sensitivity levels within the Penetrant inspection method.
| Type I – Fluorescent | Method A – Water Washable | Sensitivity Levels 1-4 |
| Type II – Visible dye | Method B – Post Emulsified (lipophilic) | |
| Method C – Solvent Removable | ||
| Method D – Post Emulsified (hydrophilic) |
The most commonly used Penetrant systems in aerospace are Type I, Methods A, B and D, Sensitivity Levels 3 and 4.
Basic Principle
A test where a helium mass spectrometer instrument is used to detect and locate small leaks. It typically uses a vacuum chamber in which a sealed part filled with Helium is contained. Helium leaks from the container, and the rate of leakge is detected by a mass spectrometer. Often used to test welds of pressure vessles.
Advantages
There are many benefits associated with helium leak testing, which include: Leaks can be detected and quantified with a high level of sensitivity. No adverse impact on the materials being tested due to the inert properties of helium. The test process is essentially dry and temperature independent.
A hydrostatic test is a procedure of determining the strength and leak-resistance of pressure vessels. This is one of the easiest methods of detecting leaks in pressure vessels. This test is among the most reliable and safest methods used to determine the integrity and soundness of a newly manufactured pressure vessel or after repairs, alterations and before the commissioning stage.
The component is filled completely with water or another liquid. Pressure is then applied to the liquid for the required time and then the outside component is examined visually for leaks.
Magnetic particle inspection (often abbreviated MT or MPI) is a nondestructive inspection method that provides detection of linear flaws located at or near the surface of ferromagnetic materials. It is viewed primarily as a surface examination method.
Basic principle
The part to be inspected is magnetized which produces lines of force or flux lines within the item. Flaws and imperfections in the item distort these flux lines causing them to ‘leak’ out. These areas of flux leakage create regions of magnetic polarity on the surface of the item, and the magnetic particles applied to the surface collect at these areas forming a visible indication seen by the inspector. Two separate magnetizations in different directions are necessary to locate flaws in all orientations. The magnetic particles are very small ferromagnetic oxides that are chemically dyed to provide contrast against the background of the part being inspected.
Advantages
MT has several advantages. The method is quick and simple to perform. The results are instantaneous and the indications appear directly on the surface of the part. This method of inspection may work through coatings such as cadmium and chrome plating and black oxide.
Limitations
The single largest limitation to this method is that it is applicable only to ferromagnetic materials (steel). Nonferrous materials (aluminum, titanium, magnesium, copper, etc.) cannot be inspected using this method.
Other Details
Demagnetization is a necessary step to remove residual magnetism that may interfere with subsequent processes (e.g., plating, welding). This is typically accomplished using an AC coil.
Nital Etch, also known as Surface Temper Etch and Temper Etch, is a non-destructive test that is used to determine if overheating has occurred in a part (after final heat treat) by abusive machining or grinding that will adversely affect the required properties of the part in question. It is used specifically to look for:
Etching will detect surface variations where softer tempered materials will darken (burn) faster than harder areas on machine and apparatus parts such as shafts, gears, splines, bearings, and journals.
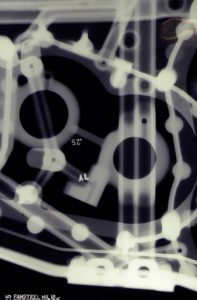
 Radiographic inspection, often referred to as RT or X-ray, is a nondestructive inspection method that provides detection of flaws located within objects. It is considered a volumetric examination method because it provides information about the internal regions of parts.
Basic principle
Radiographic inspection is accomplished by passing radiation through an object and onto a recording medium. The result is a two-dimensional image of a three-dimensional object, much like casting a shadow. The final radiograph must meet certain quality and density requirements. Radiographic quality is demonstrated by means of an image quality indicator (IQI), a separate device positioned on each radiograph. IQI’s are also referred to as penetrameters. The density or darkness of the radiograph must be within a specific range to ensure that flaws will be visible to the film reader.
Radiation Sources
 The radiation used is either x-radiation or gamma radiation. X-radiation is produced electrically in an x-ray tube and is familiar to people since they encounter this with medical or dental procedures. Gamma radiation is emitted by radioactive materials and is utilized more commonly in field radiography since it does not require a power source. Radioactive materials and gamma radiation are also used in medical treatments.
History
X-rays were discovered accidentally in 1895 by Wilhelm Conrad Roentgen. Studies done with Crookes tubes, a predecessor of the cathode ray tube (CRT), caused certain chemicals and photographic plates to be affected when these tubes were energized. This energy or radiation was labeled as x-radiation because it was an unknown form of energy. The name was never changed. About the same time Marie and Pierre Curie discovered a similar form of energy being emitted by radium ore.
These forms of radiation are similar in their effects. One major difference is that x-radiation can be turned off, but gamma radiation cannot because it is being continuously emitted by the radioactive material.
Advantages
This method of inspection can be used on virtually any material, metallic and nonmetallic, since radiation can penetrate all forms of matter. It can be used to inspect castings, forgings or weldments. The results of radiographic inspection are most commonly viewed on a radiograph or x-ray which becomes a permanent physical record of the inspection. Digital and real-time radiographic techniques are becoming more common more widely used. These allow the images to be viewed and stored electronically.
Limitations
Radiographic inspection is limited by the overall part configuration and the equipment capabilities available. The relationship between the x-ray beam direction and flaw orientation determines the detectability of flaws. Due to safety considerations, radiography is typically performed in a cabinet or a vault to shield the operator from radiation exposure.
Other Details
Radiography is one of the more expensive methods of inspection. Contributing factors are the radiographic film which contains silver, chemicals used for processing the radiographs, hazardous waste disposal, and licensing issues related to the radiographic equipment.
Stay in the know with all things MIL.
Sign up for our email list for updates.
Search our approvals